DEVELOPING A RAYCASTING ‘3D’ ENGINE GAME IN PYTHON AND PYGAME – PART 5

The following additions and changes to the game engine will be covered:

  • Adding the ability for the player to look up and down. (As requested by Matthew Matkava)
  • Addition of basic spatial sound to the enemy.
  • Bugfix that relates to the player footstep sounds.

Player Looking Up and Down

First, we will look at adding the ability for the player to look up and down, or more accurately, add the illusion of looking up and down. As mentioned in the first post in this series, the game engine being developed is not actually 3D but rather a pseudo-3D rendering of a 2D game world. This means, in essence, that there is no Z-axis (up and down) in the game world. Thus the player looking up and down is simply an illusion and does not affect the game in any way.

All sprite and walls rendered in the game engine, as well as the point where the skybox ends and the floor starts, use a pre-defined horizon as a reference point to determine the position and height of the items to be drawn to the screen, up to this point the horizon used was half of the game window resolution and was defined in the settings.py file with the name HALF_HEIGHT:

HALF_HEIGHT = resY // 2

To create the illusion of the player looking up and down, we will move this horizon up and down based on the users’ inputs:

The first thing we need to do is rename HALF_HEIGHT in the settings.py file, as it will still be required but only to determine the center of the game window:

BASE_HALF_HEIGHT = resY // 2

Next, a new horizon value needs to be declared, and this will be done inside the Player class in the player.py file as it will now be under the control of the player, so inside the Player __init__ method, the following has been added:

self.HALF_HEIGHT = BASE_HALF_HEIGHT

BASE_HALF_HEIGHT is set as a starting value, ensuring that the game starts with the player looking straightforward.

The mouse movement function in the Player class was updated to move newly defined Horizon value based on mouse movement:

def mouse_control(self):
    if pygame.mouse.get_focused():
        difference = pygame.mouse.get_pos()
        difference_x = difference[0] - HALF_WIDTH
        difference_y = difference[1] - BASE_HALF_HEIGHT
        pygame.mouse.set_pos((HALF_WIDTH, BASE_HALF_HEIGHT))
        self.angle += difference_x * self.sensitivity
        if (resY - resY / 4) >= self.HALF_HEIGHT >= resY/4:
           self.HALF_HEIGHT -= difference_y * self.look_sensitivity
        elif (resY - resY / 4) <= self.HALF_HEIGHT:
           self.HALF_HEIGHT = (resY - resY / 4)
        elif self.HALF_HEIGHT <= resY/4:
           self.HALF_HEIGHT = resY/4

Top and bottom boundaries are set to prevent the player from looking too far up and down, which can result in issues in the game engine.

All references to the original HALF_HEIGHT value defined in the settings.py file need to be changed to use the new Player.HALF_HEIGHT value. The locations of these references are as follows:

  • The background method in the Drawing class (prawing.py)
  • raycasting function (raycasting.py)
  • locate_sprite method in the SpriteBase class (sprite.py)

Basic Enemy Spatial Sound

Next, let us look at adding basic spatial sound to the enemy. The idea behind this implementation is that the sound the enemy makes gets louder as it gets closer to the player. This is implemented in the following method located in the Enemy class (enemy.py):

def play_sound(self,  distance):
    if not pygame.mixer.Channel(4).get_busy():
       volume = (1 / distance)*10
       pygame.mixer.Channel(4).set_volume(volume)
       pygame.mixer.Channel(4).play(pygame.mixer.Sound(self.sound))

Where the distance variable value is set to the distance between the enemy and the player.
The play_sound method is then called from the move function of the player class as per the code below:

def move(self, player, object_map, distance):
    new_x, new_y = player.x, player.y
    if self.activated:
        if player.x > self.x:
            new_x = self.x + ENEMY_SPEED
        elif player.x < self.x:
            new_x = self.x - ENEMY_SPEED

        if player.y > self.y:
            new_y = self.y + ENEMY_SPEED
        elif player.y < self.y:
            new_y = self.y - ENEMY_SPEED

        self.x, self.y = check_collision(self.x, self.y, new_x, new_y, object_map, ENEMY_MARGIN)
        if (self.x == new_x) or (self.y == new_y):
            self.moving = True
            self.play_sound(distance)
        else:
            self.moving = False

This will result in the enemy, while moving, making a sound with a loudness inversely proportional to the distance to the player.

Footstep Sound Bugfix

A bug in the previous version of the code resulted in the player only making footstep sounds if the player was not moving due to a collision with an object. The code below fixes this issue by checking if the players x or y positions changed, and if any of the two values have changed, the footstep sound will be played:

def keys_control(self, object_map):
    sin_a = math.sin(self.angle)
    cos_a = math.cos(self.angle)
    keys = pygame.key.get_pressed()
    if keys[pygame.K_ESCAPE]:
        exit()
    if keys[pygame.K_w]:
        nx = self.x + player_speed * cos_a
        ny = self.y + player_speed * sin_a
        self.x, self.y = check_collision(self.x, self.y, nx, ny, object_map, HALF_PLAYER_MARGIN)
        if nx == self.x or ny == self.y:
            self.play_sound(self.step_sound)
    if keys[pygame.K_s]:
        nx = self.x + -player_speed * cos_a
        ny = self.y + -player_speed * sin_a
        self.x, self.y = check_collision(self.x, self.y, nx, ny, object_map, HALF_PLAYER_MARGIN)
        if nx == self.x or ny == self.y:
            self.play_sound(self.step_sound)
    if keys[pygame.K_a]:
        nx = self.x + player_speed * sin_a
        ny = self.y + -player_speed * cos_a
        self.x, self.y = check_collision(self.x, self.y, nx, ny, object_map, HALF_PLAYER_MARGIN)
        if nx == self.x or ny == self.y:
            self.play_sound(self.step_sound)
    if keys[pygame.K_d]:
        nx = self.x + -player_speed * sin_a
        ny = self.y + player_speed * cos_a
        self.x, self.y = check_collision(self.x, self.y, nx, ny, object_map, HALF_PLAYER_MARGIN)
        if nx == self.x or ny == self.y:
            self.play_sound(self.step_sound)
    if keys[pygame.K_e]:
        self.interact = True
    if keys[pygame.K_LEFT]:
        self.angle -= 0.02
    if keys[pygame.K_RIGHT]:
        self.angle += 0.02

The source code for everything discussed in the post can be downloaded here and the executable here.

DEVELOPING A RAYCASTING ‘3D’ ENGINE GAME IN PYTHON AND PYGAME – PART 5

3D PRINT FINISHING

When a 3D print completes printing, it seldom looks like a refined and finished item, from support material that needs to be removed to rough edges that need to be smoothed, quite a bit of work is required to make a 3D print look acceptable.

Here is a quick guide of how I finish my 3D prints to look less like 3D printed items and more like professionally produced commercial products.

Let us first look at the tools I use in the finishing process:

IMG_1747

Wire Cutting Pliers and Long Nose Pliers – These are useful when removing support material from 3D prints.

IMG_1757

Wire Brushes – Perfect for a first pass cleanup on newly printed items to remove any stringing and excess material.

IMG_1754

Needle Files – Useful for smoothing rough spots on prints, especially in small confined areas.

IMG_1761

Craft Knives – To remove any stubborn unwanted material from 3D prints.

IMG_1765

Model Sanding Block – For standing confined areas of 3D prints.

IMG_1770

Heated 3D Print Finishing Tool – Perfect for removing stringing and extra material from 3D prints.

IMG_1782

Sand Paper – Used for general smoothing of 3D prints. It is best to wet sand 3D prints as it prevents the print from melting and getting ruined by the heat created from sanding friction.

IMG_1775

Wood Filler – Used to fill any unwanted gaps and holes in 3D prints.

IMG_1793

Spray Paint Primer – This is used to prime 3D prints for painting. Priming also hides small imperfections on 3D prints. Use a primer that is plastic friendly.

IMG_1779

Model Paint and Brushes – I like Tamiya model paint and brushes, but any model paint supplies should work great.

Now let us look at the finishing process.

Step 1: Select a model and 3D print it.

It is very important to note that the better your 3D printer is maintained and configured, the better the end results will be. Here is an example of the same model 3D printed and finished. The first was printed before I replaced my hot end and did some basic maintenance on my 3D printer (the nozzle was worn, and the heater cartridge started giving issues, I also tightened the belts). The second was printed after I completed the replacement and maintenance.

IMG_1691

The print lines in the first print are clearly visible, even after sanding, while the second model has a smooth finish even with minimal sanding.

Step 2: Remove support material, initial sanding, and filler.

Using wire brushes to do a quick pass over the 3D print to remove any excess material, then sand model using wet sanding method (using sandpaper and water). When sanding the 3D print, start standing with coarse-grit sandpaper (60 grit) and work down to a finer grit (220 grit). Finally, fill any gaps using wood filler.

Step 3: Final Sanding.

When the wood filler has dried, go over the print one final time with very fine grit sandpaper (400 grit).

Step 4: Priming the 3D print

When spraying the 3D print with primer, it is important to hold the spray can at least 30cm away from the 3D print and do long even passes over the model, starting and ending each pass to the side of the 3D print and not directly on the print as it will result in droplets forming.

Step 5: Painting the 3D print

IMG_1601

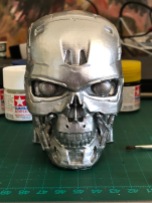
After the primer has completely dried, it is time to paint the model as desired. Using a wethering technique like black-washing brings out the detail of 3d prints amazingly. Black-washing is done by mixing black (or dark color) paint with some paint thinners, then painting all over the model, putting particular focus on getting the paint into all the nooks and crannies on the print. Then finally wiping away most of the paint with some paper towel. This gives the model a weathered realistic look.

Step 6: Done!

And finally, display your newly created item with pride.

3D PRINT FINISHING

The Legend of Zelda Breath of the Wild


abloggersjourney

This post forms part of a series covering the entire Legend of Zelda franchise hosted by NekoJonez , so if you love the Legend of Zelda as much as I do, browse over to this hub article on his blog, which contains links to article (like this one) on each Legend of Zelda game in the series created by a variety of different bloggers.

The legend of Zelda series is one of my favorite gaming series, as can be seen by the numerous Legend of Zelda items in my gaming collection.

So to say that I was eagerly awaiting the release of Breath of the Wild earlier this year is an understatement of note, so was it worth the wait? Did it live up to the hype? Lets find out.

BOTW_WiiU

The Legend of Zelda Breath of the Wild is the latest, and in my opinion greatest, adventure in the Legend of Zelda series. It released in March 2017 (Nearly 6 years after Skyward Sword, the last major console Legend of Zelda game released) on the WiiU and Nintendo Switch and received almost unanimous perfect review scores (With a current Metacritic score of 97%).

The Legend of Zelda games have always been open world to some extent, but Breath of the Wild not only truly introduced the Zelda series to a fully realized open world, but also changed the way that we will look at all other open world games going forward, revitalizing the open world genre as a whole. Unlike many other open world games, where the world seems lifeless and repetitive, Breath of the Wild managed to create a representation of Hyrule that seems alive, dynamic and real.

The amount of freedom the game allows is also truly amazing, and any situation the game presents can be approached from various different ways. This combined with an amazing physics engine fully releases the player’s imagination in a sandbox of almost endless possibilities. Some examples of this is how bombs can be used to kill fish in ponds which can then be easily collected, or how the player can “cheat” in the motion controlled ball and maze puzzle shrines by simply flipping the control pad upside down and using the flat back of the maze to easily guide the ball to the target, or realizing that any metal item can conduct electricity and then using spare weapons and armor to solve electricity puzzles, or how an enemy encampment can be destroyed by using the wind and a patch of dry grass to start a wild-fire to burn it to a crisp, or how a wooden shield can be used to catch and collect enemy arrows fired at you . These are but a few of many examples.

Breath of the Wild is not an easy game, but you never feel that it is unfair. Breath of the Wild harks back to a time in gaming when games actually presented a genuine challenge. This is very apparent in Breath of the Wild in how even from very early in the game you are free to go to areas where very high level and dangerous enemies reside, which in the beginning you are very unlikely to defeat. But as you gain more health and stamina, get better weapons and armor and also get better at the game you will later be able to defeat those same enemies much more easily. For example, the first time I encountered a Stone Talus it was a long and grueling fight, which I only beat after numerous attempts, but after I upgraded my armor and weapons and also learned to better utilize my ranged attacks and dodging, I can now take down a Stone Talus without much effort.

The different regions in the game world vary greatly in look and feel, from the grassy plains of the Great Plateau, to the fiery Death Mountain, to the water rich Zora’s Domain, to the sandy desert of the Gerudo Wasteland. All the regions are beautifully bought to life, each with its own inhabitants, sub-quests and story arcs. All of these regions also contain villages, all unique and wonderful to explore.

Another great feature in the game is that you can buy a house, and make various upgrades to it. This provides a handy place to store items you have collected, freeing up some valuable inventory space.

One of my favorite things to do in Breath of the Wild is to go out in the world and scavenge for useful items, chopping down trees for wood, mining minerals with my hammer, hunting a variety of animals for meat or simply picking fruits, vegetables and mushrooms to use in recipes.

Crafting is done in Breath of the Wild through its cooking system. Various recipes can be discovered, through experimentation, to create a variety of potions and food items offering not only health restoration but also a wide range of temporary upgrades to attributes like stamina and sneaking.

After everything we have covered and we haven’t even touched on a major element of the game, the dungeons. Dungeons come in two varieties, firstly shrines, which are mini dungeons in which you unlock abilities and spirit orbs (which are used to upgrade health and stamina) and then the five main dungeons. The five main dungeons consist of the four Divine Beats and finally Hyrule Castle. All five main dungeons end with a boss encounter with an embodiment of Ganon. These dungeons offer a wide variety of challenges, from truly impressive puzzles to powerful enemies, and finishing one gives you a real sense of achievement.

If you haven’t realized this yet, I truly love this game and it is easily in my top three favorite games of all time, and is definitely my favorite Legend of Zelda game.

I enjoyed every second of this game and even after spending far over a hundred hours playing, I still feel that there are things left to discover.

Quite often when a game gets huge amounts of hype and amazing reviews it ends up being a disappointment as expectations are built too high and it fails to live up to them, but this is not the case with Breath of the Wild. This game not only lives up to the hype but also exceeds it.

The Legend of Zelda Breath of the Wild

Hello world!

Hello World! Welcome to this new Blog dedicated to all things Robotics, Electronics, Artificial Intelligence, Programming, Gadgets and all such things!

I will focus on posting How To’s, Step by Step guides, Reviews and so forth on a variety of topics (As mentioned above). For the first few posts I will focus on Robots that I have either completed building already or that I am in the process of building, as well as some basic electronics needed to start anyone off on their own robot building adventure.

I think it is worthwhile to mention that my main focus is on autonomous robots and not human controlled robots, as seen on most robotics competitions where the robot is controller via a RC remote by a  human operator. This means that there is also a great deal of focus on the development of the artificial intelligence utilised by the robots, this can range from simple obstacle avoidance or drop detection to vastly more complex behaviours.

So if any of the above mentioned peaks your interest, stick around and maybe you might learn something, or start building robots of your own.

Hello world!